
Showing posts with label halloween. Show all posts

Monday, October 31, 2011

Halloween House


Check out this amazing Halloween House around the corner from where we live. It is the enthuses of the sweet and cutesy side of Halloween we all love. I am not a huge fan of the gore and scary parts of Halloween not to metion I am deathly afraid of Haunted Houses (don't believe me? read this post!) So a house full of such Halloweeny~goodness makes me want to drive by every day.
I image a house just like this lured Hansel and Gretel (not that I think this house is luring little children into its oven!) but it is so kitchy craft and has about 2000 little relief society knick knack... I am completely in love.

Happy Halloween ya'll. What are the kids dressing up as, you ask?  a nerd: suspenders and all, Dracula: I have the best cape evah and a sweet lil' pumpkin!

post signature

Monday, September 26, 2011

Giant Pumpkin Wreath


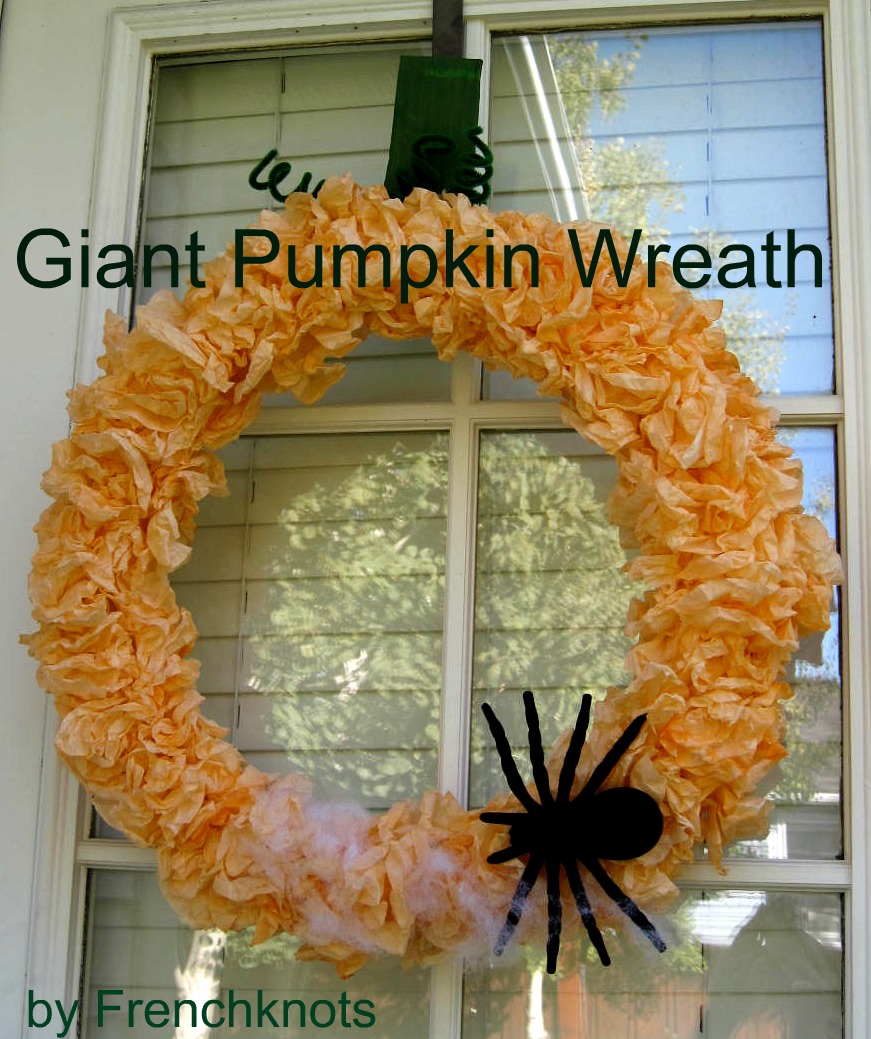
I am in love with all the coffee filter wreathes currently floating around the blogosphere. I wanted to try my hand at making one myself. I knew if I used tea bags I could make the coffee filters a yummy tan ~ perfect for fall. But I decided to take it one step further and try to dye the coffee filters a color. The only thing I had on hand was food coloring, so I thought lets try it! Yes, this giant pumpkin wreath is made with food coloring coffee filters!!

Here's how I did it:
I filled my sink with coffee filters and added just enough water to cover the filters. I then added the food coloring, I knew I wanted a high concentration of color so I used as little water as possible. I used Wilton's Orange food coloring in paste form. I prefer paste whenever I use food coloring. You can control the amount used so much better than drops. I used about half the bottle.

To be honest I had no idea if this would work, but I was amazingly surprised because IT did. You have to let the filters soak for at least 2 hours in the water. If I hadn't needed to use my sink I would have left them all day, just to see how orange they could get.
I wrung out my filters and left them in the sun to dry. It took several  hours for them to dry completely.
After I prepped my wreath by wrapping it in muslin, I formed and hot glued my "scrunch-ied" filters to the wreath, after about a half an hour of "scrunching" and gluing and I was done. When my 6 year old saw it, he exclaimed "...it's like a giant pumpkin!". After that I knew just how to proceed with the rest of the wreath.
I made the stem from a scrap of cardboard, painted it and hot clued it to the back and glued a few green pipe cleaners as vines. The pumpkin wouldn't be complete without a giant spider and a few spooky webs... so I added those as well.

And the best part is: I got everything at the dollar store. This wreath cost me around $3.00 to make. Dollar store items:
Wreath
Coffee Filters
Spider
Everything else I had around the house:
Food Coloring
Muslin
Spider Webbing
Cardboard 
Pipe Cleaners

I absolutely love the color of the filters. They have a bit of a tie dyed look which is way better than just orange tissue paper, plus the filters really held up to getting wet, food coloring, drying, scrunch-ied and then glued. I've never seen tissue paper do that!!

This is such a kid friendly craft, my boys and I had a great time making it!! I am thinking a green wreath for Christmas would look fantastic.

Linking:
post signature


Monday, October 18, 2010

Hardware Halloween

Normally we aren't decorating our pumpkins this early in the Halloween season, but my 8 year old was invited to a Halloween Party over Fall Break (no school) and came home from the party with a carved pumpkin. While he was gone, my husband had been working on a project (what a surprise!) and had every screw, nail, bolt and other miscellaneous hardware(s) all over the kitchen table. This got my 8 year thinking and he wanted to add a few screws and bolts to his pumpkin. Make his pumpkin alittle more intense. I was a little surprised by husband obliged, other than each pumpkin having about $10 in hardware, it was really fun to see his creative juices flowing.


Little brother had to get in on the action as well. He calls his pumpkin a "mechanical spider". Both boys were intensely working for a good two hours on their masterpieces.


Linking to:

Tuesday, October 20, 2009

Halloween Quilt Part 2

After I finished my first Halloween Diamond quilt and I had a few diamonds left over, so I immediately started in on a second smaller quilt. Mind you this was all last fall, I really wanted to use fabric from my stash, and not purchase anything new, but I was struggling with the border. Ultimately I decided on this tartan check pattern. After sewing it on I was not in love, but like I said, it sat for a whole year.

I have learned that sometimes I just need to let a quilt sit, tucked away for a season to let the fabric settle.

Bringing it out this fall I had a change of heart: I loved how the fabric makes the quilt pop and I love how it is true Halloween orange. Yes there is such a thing as Halloween Orange! (just like Christmas red) even if it is only in my mind. The lines are off and skiwampus which is annoying and I (probably) should have done it on the bias, but taking a risk has it's rewards: I learned that each time I create a quilt it doesn't have to be perfect!

Any Halloween quilts out there? I would love to see them!! Please share.

Monday, October 19, 2009

Halloween Quilt


I meant to submit this in time for Amy of Park City Girl Quilt Festival...but last week just got away from me. So even though I am late I still wanted to post what I had planned to show.


I am currently binding this quilt. Last fall I made each of my boys a Halloween quilt. But alas, I never got around to quilting or bounding them. So all weekend I have been working on their binding. Halloween just wouldn't be complete with out them. I can't wait to put them on their beds!!!


I picked this diamond pattern about 3 years ago and immediately started collecting fabrics. I have about 35 different fabrics in all, ranging from true Halloween prints to fabrics with orange, yellow and black. Ella quilted it with spiders, cob webs and swirls. Tuned in tomorrow to see the second quilt.


Friday, October 9, 2009

Halloween Wrap Up and Giveaway

Kitty and I have had an amazing past week hosting Sisters that Spook. When we originally thought of this idea I was excited, but as we created our ideas, made the crafts, cooked the delicious foods and wrote the posts....it only meant that much more and solidified what fun sisters can have. Thanks Kitty for such a wonderful week. We are planning to do this again, so stop by for more great ideas at Christmas time!!

To end this Halloween Extravaganza, I wanted to share with you some crafty ideas on what to do with all that Halloween candy "the day after".

*Set aside some candy for next month and make a Thanksgiving Countdown!! You know I love 'em.

*Need a gift or have a party coming up? make a few candy necklaces

*Were your trick or treaters hard core this year? Here is a link for ideas on places to donate your excess candy to those in need.

For the last week, I have search the web for great Halloween Crafting Ideas and wanted to share some of my favorites with you.

Jodi ~ Ghost Family

Amber ~ cutest witch hat for your front door.

Cheeky Magpie ~Witch Hat Candy Carrier

Value Village ~ Halloween Silhouettes

Toy-A-Day ~ Make your Own Wild Thing

Emily ~ Autumn Table Runner

Little Birdies Secrets ~ Halloween Candy Bucket

Now for the giveaway!!

I thought it would be fun to give~away a little piece from all the tricky post I did this past week.

Halloween Card ~ Ga-Ga for Gifts

Eye Patch ~ I Spy with My Little Eye

"Spooky" Garland ~ No Bones About It

Smorgasbord of Hat Supplies ~ Witches and Wizards

Vinyl Polka Dots ~ Pretty in Pumpkins

Ghost Peeps ~ Goblin Feast

Betz ~ Jack-o-latern Hoopla

Last but not least, Gabriel Olson who made our amazing "Sisters that Spook" Design is giving away a printed copy of the sister witches. Oh, Yeah!

You will get (1) entry each for doing any of the following:

Leaving a comment

Twittering about this giveaway

Blogging about this Giveaway

You will get (2) entries for becoming a follower. 5 total chances to win! Let me know in your comments which ways your are entering!! Giveaway ends 10/14.

If this post could not get any better, Trick or Treat yourself over to Kitty's Blog because she is hosting a giveaway as well with all her treats from the past week!!! You will not want to miss out.

Thursday, October 8, 2009

No Bones About It


I love garlands!! If you ever stopped by my house you'd spot a garland somewhere in my living room. My Mom had a lot of garlands in her home decor and I guess I inherited that "garland gene". Garland's can be an expensive accessory to buy for your holiday decor, but I have come up with a ever-so-cute and inexpensive alternative. With a little bit of crafty know how you'll be making garlands for every season!!


Here is what you'll need:
Ribbon, Rik Rac, String ~ something to attached your "items" to.
Letters ~ chip board, glitter letters etc.
Dollar Tree skeletons
Dollar Tree drink coasters ~ clever, I know!
Mini close pins


First you need to decide what you want to SAY: I choose "spooky" but I also thought of "eek", "boo", "trick", "ghost", "witchy" the list could go on forever.
Once you have your word...spell it out. I found these letters on clearance at Joann's for .50 cents and bought letters that I thought I could use to spell things out.

I spraypainted the chip board black, but I have also mod podged the letters with scrapbook paper.


I used rik rac for this garland, but ribbon or fabric is also a fun alternative. Measure the space where you plan to hang the garland. Remember your garland will "sag" from the weight of the "items".


Now the fun part, just start attaching your "items" to the garland. Mix and match your skeletons and coasters with the letters and be creative!! I never glue anything down permanently until I am sure. Even then alot of the time I just attach the items with clothes pins or string. That way if I don't like it I can always change it.

Linking up:
Tip Junkie
Tidy Mom

30 Handmade Days
Sumos Sweet Stuff
Blue Cricket Designs
Todays Creative Blog

Wednesday, October 7, 2009

Nightmare on 13th

You know when your really afraid and you close your eyes tight and think about "your happy place"? That is how I felt last Monday night when Kitty, her husband, Me and my husband all went to Nightmare on 13th! Located on 13th South in Salt Lake City ~ how clever! is no place for a chicken like me after dark.

It was all fun and games until we pulled into the parking lot. The cold sweats, chattery teeth and sheer panic started. I'd like to say it was smooth sailing and I was "real brave" but I screamed and pleaded 1 minute into the Haunted House for mercy and the nearest exit.

My sweet, brave, courageous husband safely escorted me out and then went back in for more!! Below is his very first blog post all about Nightmare on 13th. Thanks Sweetie!
**********************************************************My name is Adam and I'm a 36 year old Husband and Dad from boring Utah. My wife, Pamela asked me to write this blog post describing our experience at the Nightmare on 13th Street Haunted House in Salt Lake City, Utah. I'm doing the writing here because Pamela, who is notoriously afraid of all things bumpy and nightly, got a little too scared and had to leave the Haunted House after just a few minutes.
So, here I am, obliged by my wife to fill in the gory details and convince all of you that you should go, have fun with with your sweetie, and make a wild night of the "Super Fun and Scary" Nightmare on 13th Street Haunted House.
Well, let me be the first to say that this is not a typical "Oh My Gosh", "Super Fun" Haunted House. Don't get me wrong, you'll be happy you went, but you won't feel actual joy until you have made it safely back to your car and driving away. That's when the relief sets in, when the anxiety dissipates, when your nervous tick digs itself out and leaves you feeling yourself again.
Take a deep breath, or 50 and now, only now can you let the good times roll.

Like a good scary movie, it can be hard to watch, difficult to sit through and ultimately nerv wracking, but in the end, that is why we go, to be safely, yet truly terrified, horrified, and mentally wreckified, right?. That's precisely what you'll experience when you go the the Scariest Haunted House in boring Utah. I promise it will be worth every minute and every penny.
*****************************************************

Nightmare on 13th ~ "Featured in "USA Today" as one of the Top 13 Haunted Houses in the U.S." With 20 years of experience and more than 50 different themed areas haunted by nearly 100 characters and 12 Hollywood-quality animatronic creatures, Nightmare on 13th is Utah’s scariest haunted house.

Where: 300 West 1300 South, Salt Lake City

When: September 25-30; October - Monday-Thursday 7:30 to 10 p.m.; Friday-Saturday, 7:30 p.m. to midnight; Saturday, October 31 will be the final night. Closed Sundays.

How much: $15 Nightmare, $20 Xtreme Nightmare, $30 Fast Pass, children 8 and under free. Online specials are available for groups and combined passes for Xtreme Nightmare and Fast Pass for only $20 at http://www.nightmareon13th.com/


pictures courtesy of Nightmare on 13th

Tuesday, October 6, 2009

Goblin Feast

Growing up on Halloween night, our family ate Sloppy Joes before hitting the pavement and knocking doors for candy. It was always a happy tradition and warmed our tummies to face the cold wind, potential rain and weather of All Hallows Eve. (We grew up in Oregon, the weather was very unpredictable.) With my own boys we like to have a Goblin Feast a few days before Halloween, eating Sloppy Joes and all.

For my little goblins I wanted to set the mood of a graveyard: cob webs, tombstones, spiders ~ you get the idea. The first place I went searching for table decorations was Dollar Tree, almost everything on this table I got from there: tablecloth, spider webs, plates, candy, chains. I could have gone crazy buying up everything in sight, but I tried to be sensible. If you need decorations and your on a budget, I recommend Dollar Tree.
I decorated the table and chairs with webs and mummy gauze. Ghost chains made for a bewitching centerpiece. We ate dinner by candlelight as we sipped our spider drinks. Tricky goblins left candy for dinner guests. But, we saved the best for last, after dinner each guest had to "catch" their own dessert. Goblin fun was had by all..

Catching dessert: we hung peep ghosts from the dinner table chandelier. Eating them off the string was goblin good!

Making tombstones as place settings was a goblin delight!

Dying to know how to make our crawling spider soda drink? Kitty and her little goblin helpers will have your cauldron simmering in no time.

Monday, October 5, 2009

I Spy with my Little Eye

All I am asking for is a good eye patch! Those flimsy ones my kids bring home from pirate birthday parties or the dollar store ~ they always brake after a few "Aye Matey". With Halloween around the corner my kids are contemplating being Pirates. I told them: "The only way your being a pirate is if I make your eye patch".
Hence: The Homemade Eye Patch.

This is so easy, you'll have this made before Johnny Depp can say: Captain Jack Sparro
Supplies:
  • Felt: Pick any color and choose a high quality felt. You only need a piece 3" by 3". The polyester blend is almost impossible to sew with.
  • Elastic: the very skinny kind
  • Fabric glue
  • Sew machine
Three Easy Steps:
#1 Download this template for the patch. Trace and cut around your felt.
#2 Take your elastic and measure your child's head. With your fabric glue, glue elastic ends to patch.
#3 Sew a quarter of an inch all the way around the patch.
Todays Creative Blog


Saturday, October 3, 2009

Pretty in Pumpkins


I love to decorate my porch for FALL. Pumpkins, gourds, squash, corn stocks...I love it ALL. I think it has to do with the cold weather and wanting to give each friend who knocks on my door a warm welcome. And nothing says welcome like my front porch!
The family went and picked their favorites at the local pumpkin patch.
Did you notice my Polka-A-Dot Pumpkins? Aren't they pretty? Want to learn? Me too!
First: Wash and Dry your pumpkin. Second: Get some vinyl, have dots in all different sizes made. Third: Stick the dots all over your pumpkin.
Fourth: Get yourself a good can of quality spray paint. I like this brand, Design Master, the gloss is really pretty. Pick any color, in the past I've used brown and white as well as black.
Fifth: In a well ventilated area and using a tarp to protect the ground, Spray your pumpkin(s)!
Aren't they pretty? Make sure you let the pumpkin dry completely before moving. It only takes a few minutes.
Sixth: Peel off the dots. Place on your porch and invite all your friends over!

Linking up!:

homework

Blue Crocket Designs
Tidy Mom
Craft O Maniac
Blog Widget by LinkWithin